Earlier this week I had a piece published over on the Solarwinds Thwack forums titled Start Automating Your Career where I tongue in cheek point out that automation has reached a fever pitch over the last few years. My hope is that by sharing a couple of actionable tips, more people can take their first steps towards scripting and automating.
Given that I was publicly offering advice to people on how to automate their mundane tasks away, I thought that it was only fair if I took my own advice. Or in other words, I was going to eat my own dog food.
In my Thwack piece I offer up three general steps that you can take to get started automating:
- Pick a Framework
- Find a Task
- Use the community
What you’ll find below is proof of my belief in this process, and how I leveraged these tips to automagic one of my problems away.
The Task and Framework
Audit’s are a fact of life in my role and any audit requires a lot of document collection. Anytime you can make that collection process easier, the auditors can expect a more consistent result and you can expect to pull out less hair. Audits happen with some level of regularity and auditors look for consistent data, so there are opportunities abound for standardization and automation of a process. In this case the task is fairly obvious: create a tool to efficiently capture the data necessary for audits. More specifically, I need to get backup documentation for our auditors.
Luckily, we use Veeam Backup and Replication (VBR) for our backups. The fine folks over at Veeam have provided a PowerShell module by default with VBR installations for at least the last several major versions of the product. Recently I used this framework to create a simple script that I describe in Veeam backup report via PowerShell. The script creates a little gap report, but that’s about it. It was fun task, but I got feedback from several folks that took the form of “But what about…” This time around I decided to see how easily I could build a more extensible script, that could have more utility moving forward.
So I’ve identified my task: automate data collection. I’ve also got a framework to use with, the Veeam PowerShell module, so I guess all that’s left is to use the community….
Invoke-vCommunity
A number of years back, I decided that I wanted to become more involved in the community, so I became a VMUG leader. Helping people and networking with like-minded individuals was intoxicating and this past year I took a couple opportunities to further engage, most recently with the Veeam Vanguards. I mention this group, because it’s the Vanguards I reached out to for help with one item of this script.
I just couldn’t get a section of my report to work the way I wanted it to. I knew I was close, but this project was supposed to be fun, and beating your head on your own desk isn’t fun, so I asked for help. It’s not an easy thing to do, but making yourself vulnerable and opening yourself often yields positive results.
Within minutes of posting my question in the Vanguard Slack, my friend Craig popped up and said “Hey, I know someone else who’s having troubles with this too!” Several more minutes go by, and lo and behold, here’s Craig with a KB article to help me out. Ultimately, the KB didn’t provide the fix, but that’s immaterial, as the community and the Vanguards were there to help! The other great thing about the vCommunity, is that there are often opportunities to pay it forward. In the same spirit as Craig sharing the KB, I took a few minutes out of my day to share the resolution on the Veeam forums, on the off chance that someone else needs a helping hand.
The Script
Since I followed my tips, I should have a script right?
I do! It’s a big one, so I’m going to break the script down into a few sections. It is large, so I’m including a link to a downloadable version at the bottom of this post.
The start
First and foremost, I want this script to be helpful and useful. I decided to make use of Parameters to make the process easier to run from the commandline. The use of parameters makes it easier for others to use, with some reasonable expectations of what’s going to happen. I also plan on using this myself, so I made it easy to just run by specifying defaults for many of the parameters. I’ll go another level deeper in a post on parameters very soon-ish.
I’ll also highlight that some of these parameters aspirational. You’ll notice that some are commented out. That’s intentional, to highlight where I think this script could go next. To that end if you try this script out and find it helpful, please let me know and I’ll continue development of it.
Some highlights
- ReportType is mandatory, because that’s why we’re here.
- Both OutputType and ReportType leverage Validation Sets to control input values.
- The Parameter Sets named VBRCred lump parameters together related items
### Define input parameter
[CmdletBinding(DefaultParametersetName='None')]
param(
    [Parameter(ParameterSetName='ReportType',Mandatory=$true)][ValidateSet('All', 'Backup','Copy','History','Gap')][string]$ReportType ="All",
    #[Parameter(ParameterSetName='JobType',Mandatory=$false)][switch]$SingleJob,
    #[Parameter(ParameterSetName='JobType',Mandatory=$true)][string]$JobName,
    [string]$vCenterSvr="vcenter",
    [string]$VBRserver="VBR",
    [ValidateSet( 'HTML')][string]$OutputType='HTML',
    [Parameter(ParameterSetName='VBRCred',Mandatory=$false)][switch]$UseAlternateVBRCredentials  ,
    [Parameter(ParameterSetName='VBRCred',Mandatory=$true)][System.Management.Automation.PSCredential]$VBRCredential

)
The End or is it the Beginning?
Most of the fun stuff is in the middle of this script, so let’s get the end out of the way first. It’s like eating your salad before getting to the main course. Because I make heavy use of functions, the main routine is simple, clean and readable. Declare a bunch of things I’ll use, make sure the environment is ready and then get to it! You’ll note that I don’t comment everything, but I try to provide comments around the theme of a given section.
The magic in the main routine is the switch statement. If you’ll recall, ReportType was a mandatory parameter. That’s because the operation of this script revolves around the data that we’re gathering. Everything else is a simply a supporting character
#####Main
###Tasks for All, set the variables.
$VBRjobsHistoryArray=@()
$VBRjobsOverviewResults=@()
$ofs=";"
get-veeampluginstatus
connect-vbr

###Do the things based on the parameter things
switch ($ReportType){
  "All"{
    $GapResults=get-gapreport
    $VBRjobs=get-vbrjob
    foreach ($job in $VBRjobs){
      $VBRjobsOverviewResults+=Get-BackupJobOverview -inJob $job
      $VBRjobsHistoryArray+=Get-VBRJobHistoryOverview -injob $job
    }
    break
  }
  "Gap"{
    $GapResults=Get-GapReport
  }
  "History"{
$VBRjobsHistoryArray+=Get-VBRJobHistoryOverview -injob $job
  }
}

###Make it Pretty. Oh so pretty
Build-Output
The Good Stuff!
I stated above that this project needed to be extensible. This script will be broken up in chunks that you can run selectively. I’d also wanted to have the ability to add more functionality in the future, so putting all of the work in functions only makes sense. Here’s a breakdown of what each function does:
- get-veeampluginstatus. The first function I wrote. How can you tell? I got sloppy with my capitalization. This entire script is predicated on using the VeeamPSSnapIn that’s part of the VBR install, so obvious starting place is to verify that it’s installed and loaded. This and the connect-vbr function are just about getting ready to do work.
- Get-BackupJobOverview. The first thing auditors want to know is the overview of what you’re doing with your backups. That’s what we’re doing here, creating a basic output for our friends. I really like using custom PowerShell Objects, and you’ll see a few of them throughout this script. I have another post in the work on these nifty items, but it’s probably sufficient to point out that a custom PS object is created by using the New-Object commandlet and data is added to our custom object by using the Add-Member Commandlet. You’ll see that I use the same technique in multiple places, which should make for a more readable product. Another reason to use custom PS objects: I made this script for ME and my teams needs. By using a custom object, it becomes very very easy to swap other data elements in and out to fit your needs, without refactoring the entire script.
- Get-GapReport is the same content from Veeam backup report via PowerShell, only put into a function, so no reason to cover it again here.
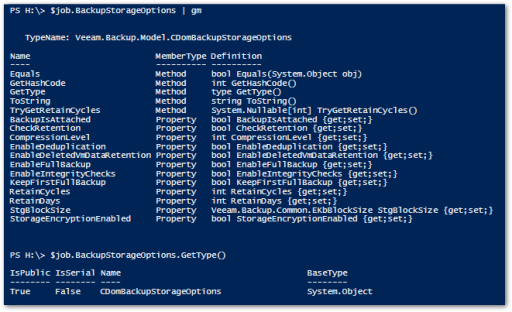
- get-scheduleoverview along with Get-BackupJobOverview and Get-VBRJobHistoryOverview were where I had a lot of fun and are the most important parts of this script. In each instance I pass in a single Veeam backup Job (CBackupJob) object. There are a ton of both properties (things that make up the object) and methods (things that you can do with the object), so in reality anything you can get out of the GUI, you can get out the PowerShell objects. A couple of fun examples for how I put the VBR module to work:
-
- I also mentioned that there are a lot of methods made available to you from the VBR cmdlets. Honestly most of the data is surfaced within the Job object itself, but if you want to scratch a little deeper… I make use of a couple methods in the Get-VBRJobHistoryOverview function. On line 145 and 146 I use the GetBackupStats() and GetDetails() methods respectively. This is the data that I need, but there’s a ton more you can do to fit your needs. As you can see from the statistics on this one object (another nested object), there’s WAY more that you can get busy with.

The Dog Food
So what do you get out of this beautiful script? That’s what we’re here for right, to see the proof in the pudding, errr dog food. At the moment there are three primary reports being created, all using the ConvertTo-HTML commandlet to make it look pretty. If you want to explore how it’s output, check out the Build-Output function.
The Backup Overview report tries to boil down what are the most basic key elements to your backup job into one table.

Similarly the History Overview Report tries to distill down the most recent history of a given job into a digestable format.
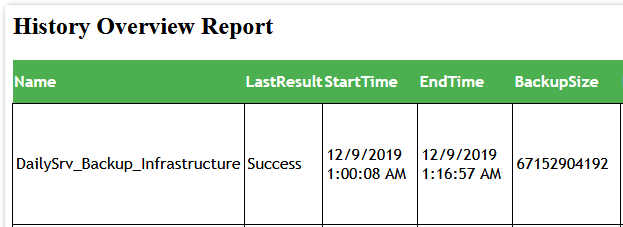
And lastly the Gap Report pulls a list of all VM’s from the vCenter target, compares the list against your various VBR jobs, so that at a glance you can see which VM’s are protected by what jobs.


The End
That’s the script in a nutshell. There’s a lot more that I could dig into here, so be on the lookout for some additional PowerShell posts soon.
I hope that if you’re using Veeam Backup and Replication, that you start putting their deep PowerShell commandlets to use soon. There’s a lot of power you can and should be taking advantage of there.
Lastly I hope this demonstrates that by choosing a task and diving in, you too can start automating your problems way.
Get your very own pretty dog food script here!
function get-veeampluginstatus{
  if(! $(Get-PSSnapin -Name VeeamPSSnapin -Registered -ea SilentlyContinue) ){
    Write-Host 'This script requires the VeeamPSSnapIn to continue. Please install this and retry.'
    exit
  }
  elseif( ! $(Get-PSSnapin -name VeeamPSSnapIn -ea SilentlyContinue)){
    Add-PSSnapin -Name VeeamPSSnapIn
  }
}
function connect-vbr{
  $session=Get-VBRServerSession -ErrorAction SilentlyContinue -WarningAction SilentlyContinue
  if($session){
    Write-Host "You are already connected to Veeam Backup and Replication $($session.server). This process will continue using the existing session."
  }
  else{
    if($UseAlternateVBRCredentials){
      Connect-VBRServer -Server $VBRserver -Credential $VBRCredential
    }
    else{
      Connect-VBRServer -Server $VBRserver
    }
  }
  if (! $(Get-VBRServerSession -ErrorAction SilentlyContinue -WarningAction SilentlyContinue)){
    write-host "we were unable to connect to $VBRserver. This script cannot proceed without a connection and will now exit."
    #exit
  }
}
function Get-BackupJobOverview($inJob){
  $JobHash=new-object system.object
  #$jobhash=$inJob.Name
  $JobHash | Add-Member -type NoteProperty -name Name -value $injob.Name
  $JobHash | Add-Member -type NoteProperty -name Enabled -value $injob.IsScheduleEnabled
  $JobHash | Add-Member -type NoteProperty -name JobType -value $(if ($injob.IsBackup){"Backup"}Elseif($injob.IsBackupSync){"Copy"})
  $JobHash | Add-Member -type NoteProperty -name FullBackup -Value $injob.BackupStorageOptions.EnableFullBackup
  $JobHash | Add-Member -type NoteProperty -name Description -value $injob.Description
  $JobHash | Add-Member -type NoteProperty -name Schedule -value $(get-scheduleoverview -injob $injob )
  $JobHash | Add-Member -type NoteProperty -name VMs -value $($injob.GetObjectsInJob()| Select-Object -Property name -ExpandProperty name|out-string)
  $JobHash | Add-Member -type NoteProperty -name Target -value $injob.TargetDir
  $JobHash | Add-Member -type NoteProperty -name RetentionCycles -value $injob.BackupStorageOptions.RetainCycles

  return $JobHash
}

function Get-GapReport{
  ### v3 not ready for targetted clusters yet
  ### $targetclusters=@("cl1","cl2")
  $GapJobArray =@()

  ###check if existing vCenter connections match entered
  if($global:DefaultVIServers -and ! ($vcentersvr -in $global:DefaultVIServers.name)){
    write-host "You are not connected to the host specified in the 'vCenterSvr'"
    write-host  "Press 'Y' to continue and disconnect from other sessions. Any other key will end this script. "
    write-host "Continue?  "
    $response = read-host
    if ( $response -ne "Y" ) {  }
    Disconnect-VIServer * -Confirm:$false -Force
  }

  $null=Connect-VIServer $vcentersvr

  ### Get a hash table from Veeam of all Jobs and member servers
  foreach($Gapjob in Get-VBRJob)
  {
    $GapJobHash=new-object system.object
    $GapVMs=$Gapjob.GetObjectsInJob() | Select-Object -Property name -ExpandProperty name
    $GapJobHash | Add-Member -type NoteProperty -name Name -value $Gapjob.Name
    $GapJobHash | Add-Member -type NoteProperty -name VMs -value $GapVMs
    $GapJobArray +=$GapJobHash
  }

  ###Get all Vm's in the target clusters. Iterate through hash table and if a job match add value to VMArray
  $GapSummaryArray =@()

  Foreach ($GapVM in get-vm){
      $GapVMArray=new-object system.object
      $vname=$(get-vm $GapVM).name
      $GapVMArray|Add-Member -type NoteProperty -name VM -Value $vname

      for ($i=0; $i -lt $GapJobArray.count ;$i++){
        if($GapJobArray[$i].VMs.Count -gt 0){
          if($GapJobArray[$i].VMs -contains $vname ){
            $GapVMArray|Add-Member -type NoteProperty -Name $($GapJobArray[$i].name) -Value "enabled"
          }
          else{
            $GapVMArray|Add-Member -type NoteProperty -Name $($GapJobArray[$i].name) -Value "-"
          }
        }
      }
      $GapSummaryArray +=$GapVMArray
   }
  return $GapSummaryArray
}

function get-scheduleoverview($injob){

  $sched=$injob.ScheduleOptions

  #Daily
  if($Sched.OptionsDaily.enabled -eq $true){
    $ScheduleOverview="Daily; " + $Sched.OptionsDaily.DaysSrv + "; " + $Sched.OptionsDaily.TimeLocal.TimeofDay
  }

  #Monthly
  elseif($Sched.OptionsMonthly.enabled -eq $true){
    $ScheduleOverview="Monthly; " + $Sched.OptionsMonthly.DayNumberInMonth.ToString() + " "
    if(! $Sched.OptionsMonthly.Months.Count -eq 12){
      $ScheduleOverview+=$Sched.OptionsMonthly.Months.ToString()
    }
    if($Sched.OptionsMonthly.DayNumberInMonth -eq "OnDay"){
      $ScheduleOverview+=$sched.OptionsMonthly.DayOfMonth.ToString() + "; "
    }
    else{
      $ScheduleOverview+=$sched.OptionsMonthly.DayOfWeek.tostring() + "; "
    }

    $ScheduleOverview+=$Sched.OptionsMonthly.TimeLocal.TimeofDay.ToString()
  }
  #periodically
  elseif($sched.OptionsPeriodically.Enabled -eq $true){
    $ScheduleOverview="Periodically; Period " + $Sched.OptionsPeriodically.FullPeriod + " minutes; "
  }
  #continuous
  elseif($sched.OptionsContinuous.Enabled -eq $true){
    $ScheduleOverview="Continuous; ; "
  }

  return $scheduleoverview
}

function Get-VBRJobHistoryOverview($injob){

  $History=Get-VBRBackupSession | Where-Object {$_.origjobname -eq $injob.name}
  $History= $history |Sort-Object -Property CreationTime -Descending

  $name=$injob.name
  write-host $name

  $HistoryHash=new-object system.object
  $HistoryHash | Add-Member -type NoteProperty -name Name -value $injob.Name
  if ($History){
    $HistoryHash | Add-Member -type NoteProperty -name LastResult -value $history[0].Result
    $HistoryHash | Add-Member -type NoteProperty -name StartTime -value $history[0].CreationTime
    $HistoryHash | Add-Member -type NoteProperty -name EndTime -value $history[0].EndTime
    $HistoryHash | Add-Member -type NoteProperty -name BackupSize -value $($history[0].GetBackupStats()).BackupSize
    $HistoryHash | Add-Member -type NoteProperty -name Details -value $($history[0].GetDetails())

    $lastfive=@()
    For ($i=0;$i -lt 5; $i++){ $lastfive+=$History[$i].Result}
    $HistoryHash | Add-Member -type NoteProperty -name LastFive -value $($lastfive|out-string)
  }else{
     $HistoryHash | Add-Member -type NoteProperty -name Details -value "No History Found"
  }
  write-host $HistoryHash

  return $HistoryHash
}
<span id="mce_SELREST_start" style="overflow:hidden;line-height:0;"></span>
Function Build-Output{
  $OutputFile="VeeamBackupOverview_$(get-date -Format HHmm_ddMMMyy)."
  switch ($OutputType){
    "HTML"{
      $Header=
        @"

          table {
          font-family: "Trebuchet MS", Arial, Helvetica, sans-serif;
          border-collapse: collapse;
          width: 100%;
          }
          th {
          padding-top: 12px;
          padding-bottom: 12px;
          text-align: left;
          background-color: #4CAF50;
          color: white;
          }
          TD {border-width: 1px;
          padding: 3px;
          border-style: solid;
          border-color: black;}

"@    ## Must remail left aligned, no whitespace allowed before string terminator
      $OutputFile=$OutputFile+"html"
      $OverviewFrag= $VBRjobsOverviewResults | ConvertTo-Html -As Table -Fragment -PreContent '</pre>
<h2>Overview Report</h2>
<pre>'|Out-String
      $HistoryFrag= $VBRjobsHistoryArray | ConvertTo-Html -As Table -Fragment -PreContent '</pre>
<h2>History Overview Report</h2>
<pre>'|Out-String
      $GapFrag = $GapResults | ConvertTo-Html -As Table -Fragment -PreContent '</pre>
<h2>Gap Report</h2>
<pre>'|Out-String
      ConvertTo-Html -Head $Header -PostContent $OverviewFrag,$HistoryFrag,$GapFrag|Out-File $OutputFile
    }
  }
}
<span id="mce_SELREST_start" style="overflow:hidden;line-height:0;"></span>
 I mean it’s referred to as the vCommunity for a reason! The one theme that comes up time and time again when talking about our tech communities, was the value of our peer connections. We learn, share and when times are tough, we support each other. Nikola Pejkova, Veeam Vanguard Community Mangager highlights the value of these connections: “I love being part of community because it enables its members cooperate together, strengthen and enrich their knowledge and learn from each others experiences.”
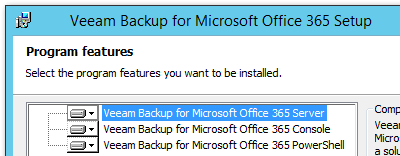 There’s little added value to an Organization running their own email infrastructure, so there has been an explosion in usage of Office 365 over the past few years. The fine folks over at Veeam have recognized this reality and recently released v4 of the
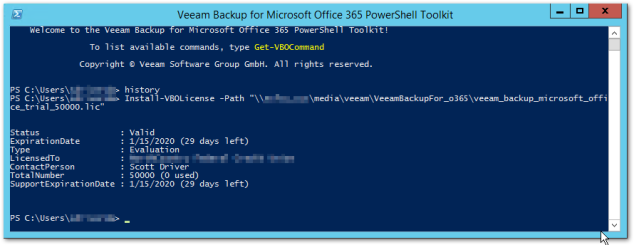
 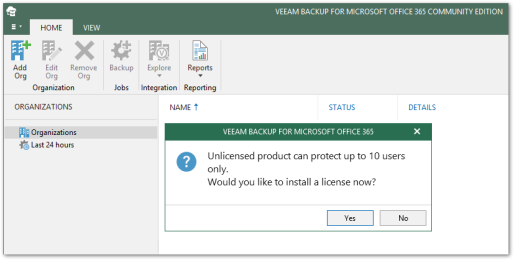 Before we move on to getting VBO configured, I’d like to point out that there is a PowerShell
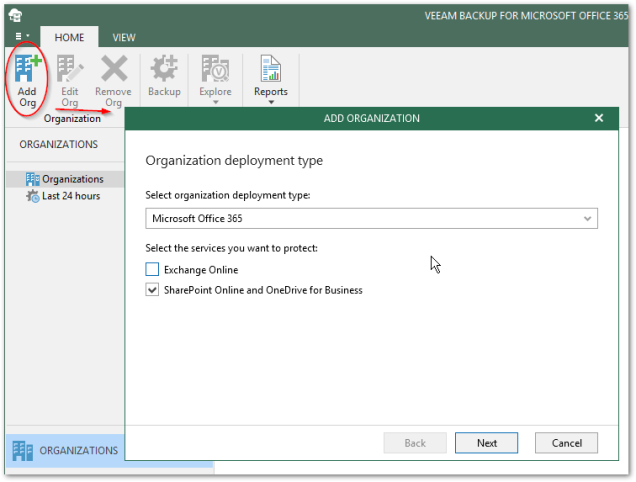
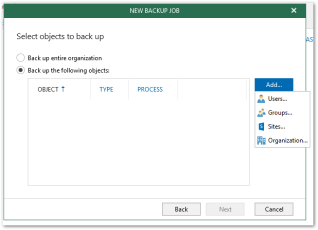
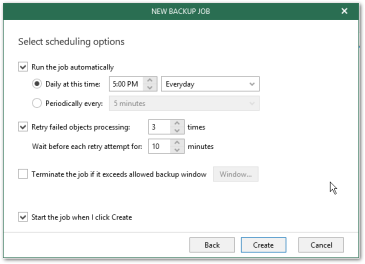 screen. You can get granular with users, groups, sites or organizations.


