Why do we vCommunity?

I went out for a lunch walk the other day to clear my head and listened to a really great episode of Freakonomics. The episode Honey I grew the economy focused on the process and motivators that drive innovation. The deep dive into drivers in particular resonated a lot with me. I saw parallels to how we approach IT as we kick off 2020. While that was super interesting, it wasn’t a giant leap for me to ask a similar question of:

Why do we get engaged in the various technological communities and what do we derive from those communities?

This seemed like a fun opportunity to hear from some of our Technology Community members to understand: Why do we vCommunity?

To Learn

For me, first and foremost, vCommunity is about Education. It stands to reason that it’s the most common entry point for people to engage. It makes sense: You need help on a topic, so you go looking around and only then do you learn about the plethora of opportunity’s available to you. When I personally started down the virtualization path, training dollars were tight, so to improve my knowledge I had to look elsewhere and as luck would have it, I found the Boston VMUG UserCon. That free one day training, gave me access to educational presentations, subject matter experts and hands on training. It was a formative moment for me, and opened my eyes to other avenues of learning. It also showed me that there were a ton of engaged people out there sharing via different mediums.

Stalwart of the vCommunity, Kyle Ruddy had something similar to share regarding his introduction to the tech communities “What I wasn’t ready for was the amount of blogs out there detailing issues I had run into. It was a complete lightbulb moment. From that point it was a gradual process of moving from reading blogs to creating blogs.”

Kyle also highlights a hallmark of the community in that there tends to be a strong desire to contribute back in the form of blogs, videos, podcasts and a host of other mediums. That was after all the genesis for VirtualVT as well. If you look at the mechanics of sharing content, it takes time and effort. You can’t help but boost your knowledge whenever you’re contributing technical content, because you end up spending more time with the underlying technology’s.  Unintentional education? Knowledge Osmosis? Whatever you call it, the brain gets bigger the more you feed it, and you have to keep feeding if you’re creating content about technologies.

To Grow

Bolstering your knowledge via the educational opportunities the communities provide is definitely a path to bigger and better things, but I’ll let you in on a not-so-secret, secret. Getting involved and putting yourself out there as a contributing member of the community can be equally impactful on your career. Contributing is an idealistic endeavor, but it often has the side effect of building your brand at the same time. I met the MVP power couple of Dave and Cristal Kawula this past fall and in a recent blog post Dave shares a bit about how he and Cristal started MVPDays and the impact their event has had on a specific community member: “…I talked him into doing his first presentation, which led to him speaking at user groups and conferences. Earlier this year he became a Microsoft MVP, and a few days ago, he actually accepted a position at Microsoft.

The experience that Dave highlights is not unique to MVPDays. It crosses groups and goes to the heart of what Matt Heldstab (VMUG Board of Directors) shared with me recently “The fantastic power of this vCommunity and its ability to elevate the careers of its members never ceases to amaze me.

It’s Fun!

vDodgeBall, vSoccer, vPoker are just a few of the side-events that come to mind for ways that we like to enjoy the lighter side of our geekdom. One of my favorite events was when our 2017 vExpert party was held at the Pinball Museum in Las Vegas. The reality is that many of us work really hard and through a plethora of events, engagement in the vCommunity can be a nice way to blow off some steam. My friend AJ Murry who I co-led a local VMUG group with, hits on this point “In the vCommunity I have found my people. I have made life long friends. I have learned great things and shared amazing experiences.

It’s all about the people

2019-12-31 14_09_51-Community _ Definition of Community by Merriam-WebsterI mean it’s referred to as the vCommunity for a reason! The one theme that comes up time and time again when talking about our tech communities, was the value of our peer connections. We learn, share and when times are tough, we support each other. Nikola Pejkova, Veeam Vanguard Community Mangager highlights the value of these connections: “I love being part of community because it enables its members cooperate together, strengthen and enrich their knowledge and learn from each others experiences.

Everywhere I’ve gone and nearly everyone I’ve interacted with has been gracious with their knowledge and time. It’s a hallmark of these communities and a reason why there are so many deep bonds. You see it in every independent blog post, every community presentation and every response to a forum post. That’s the real magic to the vCommunity: We want to be there for each other and to collective lift each other up!

So how do YOU get involved?

It’s an amazing thing being part of this community, but like many things in this world, it can be intimated to get started, so what can YOU do?

Well there’s no time like the present. There are user communities abound. Listen, I live in a rural state where my favorite urban legend says that there are more cows than people. If I can find a local community, so can you! Find one (meetup can be an excellent starting point) and go, even if it’s not in your wheelhouse. Especially if it’s not in your wheelhouse! Go learn something new, meet some interesting people and hopefully have a good time!

Got something worthwhile to share? A blog is stupid easy to create these days. I wouldn’t be here if it wasn’t! Only a year or two, it was really hard to podcast or create video equipment, as the equipment required was cost prohibitive to most. As we kick off 2020, there’s no reason not to share it loud a proud! And if creating online content isn’t enough for you, there are always conference CFPs (calls for papers) that are looking for passionate people to share their successes.

All of these options strike fear into your heart, but you’d still like to help others? Online opportunities are abound as well. Helping someone solve a problem or answer a question in a forum, benefits not just you and poster, but future assistance seekers as well.

Whatever the avenue, just do it! If you’re still not convinced, I’d like to give Kyle the last word on why we vCommunity. “Now, why do I continue to be involved… over the years, I’ve found it extremely rewarding to share my experiences and knowledge, become a mentor, [and] … build up a number of friendships that exist still to this day.”

Thank you to my friends quoted here and to all my friends out and about in the communities for all that you do.

Automate the Auditors Away – Veeam Backup Report v2

Earlier this week I had a piece published over on the Solarwinds Thwack forums titled Start Automating Your Career where I tongue in cheek point out that automation has reached a fever pitch over the last few years. My hope is that by sharing a couple of actionable tips, more people can take their first steps towards scripting and automating.

Given that I was publicly offering advice to people on how to automate their mundane tasks away, I thought that it was only fair if I took my own advice. Or in other words, I was going to eat my own dog food.

In my Thwack piece I offer up three general steps that you can take to get started automating:

  • Pick a Framework
  • Find a Task
  • Use the community

What you’ll find below is proof of my belief in this process, and how I leveraged these tips to automagic one of my problems away.

The Task and Framework

Audit’s are a fact of life in my role and any audit requires a lot of document collection. Anytime you can make that collection process easier, the auditors can expect a more consistent result and you can expect to pull out less hair. Audits happen with some level of regularity and auditors look for consistent data, so there are opportunities abound for standardization and automation of a process. In this case the task is fairly obvious: create a tool to efficiently capture the data necessary for audits. More specifically, I need to get backup documentation for our auditors.

Luckily, we use Veeam Backup and Replication (VBR) for our backups. The fine folks over at Veeam have provided a PowerShell module by default with VBR installations for at least the last several major versions of the product. Recently I used this framework to create a simple script that I describe in Veeam backup report via PowerShell. The script creates a little gap report, but that’s about it. It was fun task, but I got feedback from several folks that took the form of “But what about…” This time around I decided to see how easily I could build a more extensible script, that could have more utility moving forward.

So I’ve identified my task: automate data collection. I’ve also got a framework to use with, the Veeam PowerShell module, so I guess all that’s left is to use the community….

Invoke-vCommunity

A number of years back, I decided that I wanted to become more involved in the community, so I became a VMUG leader. Helping people and networking with like-minded individuals was intoxicating and this past year I took a couple opportunities to further engage, most recently with the Veeam Vanguards. I mention this group, because it’s the Vanguards I reached out to for help with one item of this script.

I just couldn’t get a section of my report to work the way I wanted it to. I knew I was close, but this project was supposed to be fun, and beating your head on your own desk isn’t fun, so I asked for help. It’s not an easy thing to do, but making yourself vulnerable and opening yourself often yields positive results.

Within minutes of posting my question in the Vanguard Slack, my friend Craig popped up and said “Hey, I know someone else who’s having troubles with this too!” Several more minutes go by, and lo and behold, here’s Craig with a KB article to help me out. Ultimately, the KB didn’t provide the fix, but that’s immaterial, as the community and the Vanguards were there to help! The other great thing about the vCommunity, is that there are often opportunities to pay it forward. In the same spirit as Craig sharing the KB, I took a few minutes out of my day to share the resolution on the Veeam forums, on the off chance that someone else needs a helping hand.

The Script

Since I followed my tips, I should have a script right?

I do! It’s a big one, so I’m going to break the script down into a few sections. It is large, so I’m including a link to a downloadable version at the bottom of this post.

The start

First and foremost, I want this script to be helpful and useful. I decided to make use of Parameters to make the process easier to run from the commandline. The use of parameters makes it easier for others to use, with some reasonable expectations of what’s going to happen. I also plan on using this myself, so I made it easy to just run by specifying defaults for many of the parameters. I’ll go another level deeper in a post on parameters very soon-ish.

I’ll also highlight that some of these parameters aspirational. You’ll notice that some are commented out. That’s intentional, to highlight where I think this script could go next. To that end if you try this script out and find it helpful, please let me know and I’ll continue development of it.

Some highlights

  • ReportType is mandatory, because that’s why we’re here.
  • Both OutputType and ReportType leverage Validation Sets to control input values.
  • The Parameter Sets named VBRCred lump parameters together related items
### Define input parameter
[CmdletBinding(DefaultParametersetName='None')]
param(
    [Parameter(ParameterSetName='ReportType',Mandatory=$true)][ValidateSet('All', 'Backup','Copy','History','Gap')][string]$ReportType ="All",
    #[Parameter(ParameterSetName='JobType',Mandatory=$false)][switch]$SingleJob,
    #[Parameter(ParameterSetName='JobType',Mandatory=$true)][string]$JobName,
    [string]$vCenterSvr="vcenter",
    [string]$VBRserver="VBR",
    [ValidateSet( 'HTML')][string]$OutputType='HTML',
    [Parameter(ParameterSetName='VBRCred',Mandatory=$false)][switch]$UseAlternateVBRCredentials  ,
    [Parameter(ParameterSetName='VBRCred',Mandatory=$true)][System.Management.Automation.PSCredential]$VBRCredential   

)

The End or is it the Beginning?

Most of the fun stuff is in the middle of this script, so let’s get the end out of the way first. It’s like eating your salad before getting to the main course. Because I make heavy use of functions, the main routine is simple, clean and readable. Declare a bunch of things I’ll use, make sure the environment is ready and then get to it! You’ll note that I don’t comment everything, but I try to provide comments around the theme of a given section.

The magic in the main routine is the switch statement. If you’ll recall, ReportType was a mandatory parameter. That’s because the operation of this script revolves around the data that we’re gathering. Everything else is a simply a supporting character

#####Main
###Tasks for All, set the variables.
$VBRjobsHistoryArray=@()
$VBRjobsOverviewResults=@()
$ofs=";"
get-veeampluginstatus
connect-vbr

###Do the things based on the parameter things
switch ($ReportType){
  "All"{
    $GapResults=get-gapreport
    $VBRjobs=get-vbrjob
    foreach ($job in $VBRjobs){
      $VBRjobsOverviewResults+=Get-BackupJobOverview -inJob $job
      $VBRjobsHistoryArray+=Get-VBRJobHistoryOverview -injob $job
    }
    break
  }
  "Gap"{
    $GapResults=Get-GapReport
  }
  "History"{
$VBRjobsHistoryArray+=Get-VBRJobHistoryOverview -injob $job
  }
}

###Make it Pretty. Oh so pretty
Build-Output

The Good Stuff!

I stated above that this project needed to be extensible. This script will be broken up in chunks that you can run selectively. I’d also wanted to have the ability to add more functionality in the future, so putting all of the work in functions only makes sense. Here’s a breakdown of what each function does:

  • get-veeampluginstatus. The first function I wrote. How can you tell? I got sloppy with my capitalization. This entire script is predicated on using the VeeamPSSnapIn that’s part of the VBR install, so obvious starting place is to verify that it’s installed and loaded. This and the connect-vbr function are just about getting ready to do work.
  • Get-BackupJobOverview. The first thing auditors want to know is the overview of what you’re doing with your backups. That’s what we’re doing here, creating a basic output for our friends. I really like using custom PowerShell Objects, and you’ll see a few of them throughout this script. I have another post in the work on these nifty items, but it’s probably sufficient to point out that a custom PS object is created by using the New-Object commandlet and data is added to our custom object by using the Add-Member Commandlet. You’ll see that I use the same technique in multiple places, which should make for a more readable product. Another reason to use custom PS objects:  I made this script for ME and my teams needs. By using a custom object, it becomes very very easy to swap other data elements in and out to fit your needs, without refactoring the entire script.
  • Get-GapReport is the same content from Veeam backup report via PowerShell, only put into a function, so no reason to cover it again here.
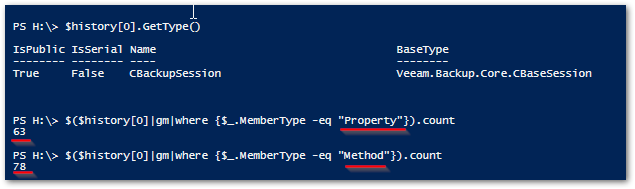
  • get-scheduleoverview along with Get-BackupJobOverview and Get-VBRJobHistoryOverview were where I had a lot of fun and are the most important parts of this script. In each instance I pass in a single Veeam backup Job (CBackupJob) object. There are a ton of both properties (things that make up the object) and methods (things that you can do with the object), so in reality anything you can get out of the GUI, you can get out the PowerShell objects.  A couple of fun examples for how I put the VBR module to work:
    • In the Get-BackupJobOverview function I want to determine if my backup job is a full backup or not. After tinkering around with my friend Get-Member, I realized that the Veeam Backup Job (CBackupJob) object is full of other objects, like the CDomBackupStorageOptions object, which contains… you guessed it a property called EnableFullBackup. You can see how I drill down to the object in line 34 (also sampled immediately below)
        $JobHash | Add-Member -type NoteProperty -name FullBackup -Value $injob.BackupStorageOptions.EnableFullBackup

2019-12-10 22_18_46-Windows PowerShell ISE

    • I also mentioned that there are a lot of methods made available to you from the VBR cmdlets. Honestly most of the data is surfaced within the Job object itself, but if you want to scratch a little deeper… I make use of a couple methods in the Get-VBRJobHistoryOverview function. On line 145 and 146 I use the GetBackupStats() and GetDetails() methods respectively. This is  the data that I need, but there’s a ton more you can do to fit your needs. As you can see from the statistics on this one object (another nested object), there’s WAY more that you can get busy with. 2019-12-10 22_33_20-Windows PowerShell ISE

The Dog Food

So what do you get out of this beautiful script? That’s what we’re here for right, to see the proof in the pudding, errr dog food. At the moment there are three primary reports being created, all using the ConvertTo-HTML commandlet to make it look pretty. If you want to explore how it’s output, check out the Build-Output function.

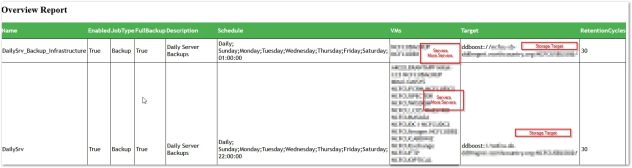
The Backup Overview report tries to boil down what are the most basic key elements to your backup job into one table.

2019-12-15 10_18_42-Clipboard

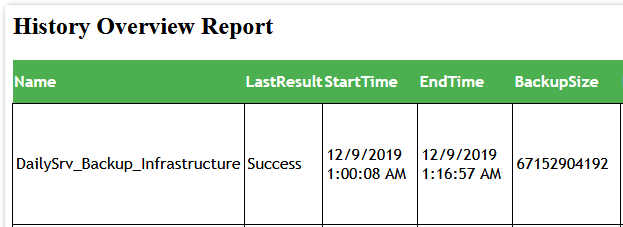
Similarly the History Overview Report tries to distill down the most recent history of a given job into a digestable format.

HistoryOverviewReport.png

And lastly the Gap Report pulls a list of all VM’s from the vCenter target, compares the list against your various VBR jobs, so that at a glance you can see which VM’s are protected by what jobs.

GapreportHeaderGapreportdetails

The End

That’s the script in a nutshell. There’s a lot more that I could dig into here, so be on the lookout for some additional PowerShell posts soon.

I hope that if you’re using Veeam Backup and Replication, that you start putting their deep PowerShell commandlets to use soon. There’s a lot of power you can and should be taking advantage of there.

Lastly I hope this demonstrates that by choosing a task and diving in, you too can start automating your problems way.

Get your very own pretty dog food script here!

function get-veeampluginstatus{
  if(! $(Get-PSSnapin -Name VeeamPSSnapin -Registered -ea SilentlyContinue) ){
    Write-Host 'This script requires the VeeamPSSnapIn to continue. Please install this and retry.'
    exit
  }
  elseif( ! $(Get-PSSnapin -name VeeamPSSnapIn -ea SilentlyContinue)){
    Add-PSSnapin -Name VeeamPSSnapIn
  }
}
function connect-vbr{
  $session=Get-VBRServerSession -ErrorAction SilentlyContinue -WarningAction SilentlyContinue
  if($session){
    Write-Host "You are already connected to Veeam Backup and Replication $($session.server). This process will continue using the existing session."
  }
  else{
    if($UseAlternateVBRCredentials){
      Connect-VBRServer -Server $VBRserver -Credential $VBRCredential
    }
    else{
      Connect-VBRServer -Server $VBRserver
    }
  }
  if (! $(Get-VBRServerSession -ErrorAction SilentlyContinue -WarningAction SilentlyContinue)){
    write-host "we were unable to connect to $VBRserver. This script cannot proceed without a connection and will now exit."
    #exit
  }
}
function Get-BackupJobOverview($inJob){
  $JobHash=new-object system.object
  #$jobhash=$inJob.Name
  $JobHash | Add-Member -type NoteProperty -name Name -value $injob.Name
  $JobHash | Add-Member -type NoteProperty -name Enabled -value $injob.IsScheduleEnabled
  $JobHash | Add-Member -type NoteProperty -name JobType -value $(if ($injob.IsBackup){"Backup"}Elseif($injob.IsBackupSync){"Copy"})
  $JobHash | Add-Member -type NoteProperty -name FullBackup -Value $injob.BackupStorageOptions.EnableFullBackup
  $JobHash | Add-Member -type NoteProperty -name Description -value $injob.Description
  $JobHash | Add-Member -type NoteProperty -name Schedule -value $(get-scheduleoverview -injob $injob )
  $JobHash | Add-Member -type NoteProperty -name VMs -value $($injob.GetObjectsInJob()| Select-Object -Property name -ExpandProperty name|out-string)
  $JobHash | Add-Member -type NoteProperty -name Target -value $injob.TargetDir
  $JobHash | Add-Member -type NoteProperty -name RetentionCycles -value $injob.BackupStorageOptions.RetainCycles

  return $JobHash
}

function Get-GapReport{
  ### v3 not ready for targetted clusters yet
  ### $targetclusters=@("cl1","cl2")
  $GapJobArray =@()

  ###check if existing vCenter connections match entered
  if($global:DefaultVIServers -and ! ($vcentersvr -in $global:DefaultVIServers.name)){
    write-host "You are not connected to the host specified in the 'vCenterSvr'"
    write-host  "Press 'Y' to continue and disconnect from other sessions. Any other key will end this script. "
    write-host "Continue?  "
    $response = read-host
    if ( $response -ne "Y" ) {  }
    Disconnect-VIServer * -Confirm:$false -Force
  }

  $null=Connect-VIServer $vcentersvr 

  ### Get a hash table from Veeam of all Jobs and member servers
  foreach($Gapjob in Get-VBRJob)
  {
    $GapJobHash=new-object system.object
    $GapVMs=$Gapjob.GetObjectsInJob() | Select-Object -Property name -ExpandProperty name
    $GapJobHash | Add-Member -type NoteProperty -name Name -value $Gapjob.Name
    $GapJobHash | Add-Member -type NoteProperty -name VMs -value $GapVMs
    $GapJobArray +=$GapJobHash
  }

  ###Get all Vm's in the target clusters. Iterate through hash table and if a job match add value to VMArray
  $GapSummaryArray =@()

  Foreach ($GapVM in get-vm){
      $GapVMArray=new-object system.object
      $vname=$(get-vm $GapVM).name
      $GapVMArray|Add-Member -type NoteProperty -name VM -Value $vname

      for ($i=0; $i -lt $GapJobArray.count ;$i++){
        if($GapJobArray[$i].VMs.Count -gt 0){
          if($GapJobArray[$i].VMs -contains $vname ){
            $GapVMArray|Add-Member -type NoteProperty -Name $($GapJobArray[$i].name) -Value "enabled"
          }
          else{
            $GapVMArray|Add-Member -type NoteProperty -Name $($GapJobArray[$i].name) -Value "-"
          }
        }
      }
      $GapSummaryArray +=$GapVMArray
   }
  return $GapSummaryArray
}

function get-scheduleoverview($injob){

  $sched=$injob.ScheduleOptions

  #Daily
  if($Sched.OptionsDaily.enabled -eq $true){
    $ScheduleOverview="Daily; " + $Sched.OptionsDaily.DaysSrv + "; " + $Sched.OptionsDaily.TimeLocal.TimeofDay
  }

  #Monthly
  elseif($Sched.OptionsMonthly.enabled -eq $true){
    $ScheduleOverview="Monthly; " + $Sched.OptionsMonthly.DayNumberInMonth.ToString() + " "
    if(! $Sched.OptionsMonthly.Months.Count -eq 12){
      $ScheduleOverview+=$Sched.OptionsMonthly.Months.ToString()
    }
    if($Sched.OptionsMonthly.DayNumberInMonth -eq "OnDay"){
      $ScheduleOverview+=$sched.OptionsMonthly.DayOfMonth.ToString() + "; "
    }
    else{
      $ScheduleOverview+=$sched.OptionsMonthly.DayOfWeek.tostring() + "; "
    }

    $ScheduleOverview+=$Sched.OptionsMonthly.TimeLocal.TimeofDay.ToString()
  }
  #periodically
  elseif($sched.OptionsPeriodically.Enabled -eq $true){
    $ScheduleOverview="Periodically; Period " + $Sched.OptionsPeriodically.FullPeriod + " minutes; "
  }
  #continuous
  elseif($sched.OptionsContinuous.Enabled -eq $true){
    $ScheduleOverview="Continuous; ; "
  }

  return $scheduleoverview
}

function Get-VBRJobHistoryOverview($injob){

  $History=Get-VBRBackupSession | Where-Object {$_.origjobname -eq $injob.name}
  $History= $history |Sort-Object -Property CreationTime -Descending

  $name=$injob.name
  write-host $name

  $HistoryHash=new-object system.object
  $HistoryHash | Add-Member -type NoteProperty -name Name -value $injob.Name
  if ($History){
    $HistoryHash | Add-Member -type NoteProperty -name LastResult -value $history[0].Result
    $HistoryHash | Add-Member -type NoteProperty -name StartTime -value $history[0].CreationTime
    $HistoryHash | Add-Member -type NoteProperty -name EndTime -value $history[0].EndTime
    $HistoryHash | Add-Member -type NoteProperty -name BackupSize -value $($history[0].GetBackupStats()).BackupSize
    $HistoryHash | Add-Member -type NoteProperty -name Details -value $($history[0].GetDetails())

    $lastfive=@()
    For ($i=0;$i -lt 5; $i++){ $lastfive+=$History[$i].Result}
    $HistoryHash | Add-Member -type NoteProperty -name LastFive -value $($lastfive|out-string)
  }else{
     $HistoryHash | Add-Member -type NoteProperty -name Details -value "No History Found"
  }
  write-host $HistoryHash

  return $HistoryHash
}
<span id="mce_SELREST_start" style="overflow:hidden;line-height:0;"></span>
Function Build-Output{
  $OutputFile="VeeamBackupOverview_$(get-date -Format HHmm_ddMMMyy)."
  switch ($OutputType){
    "HTML"{
      $Header=
        @"

          table {
          font-family: "Trebuchet MS", Arial, Helvetica, sans-serif;
          border-collapse: collapse;
          width: 100%;
          }
          th {
          padding-top: 12px;
          padding-bottom: 12px;
          text-align: left;
          background-color: #4CAF50;
          color: white;
          }
          TD {border-width: 1px;
          padding: 3px;
          border-style: solid;
          border-color: black;}

"@    ## Must remail left aligned, no whitespace allowed before string terminator
      $OutputFile=$OutputFile+"html"
      $OverviewFrag= $VBRjobsOverviewResults | ConvertTo-Html -As Table -Fragment -PreContent '</pre>
<h2>Overview Report</h2>
<pre>'|Out-String
      $HistoryFrag= $VBRjobsHistoryArray | ConvertTo-Html -As Table -Fragment -PreContent '</pre>
<h2>History Overview Report</h2>
<pre>'|Out-String
      $GapFrag = $GapResults | ConvertTo-Html -As Table -Fragment -PreContent '</pre>
<h2>Gap Report</h2>
<pre>'|Out-String
      ConvertTo-Html -Head $Header -PostContent $OverviewFrag,$HistoryFrag,$GapFrag|Out-File $OutputFile
    }
  }
}
<span id="mce_SELREST_start" style="overflow:hidden;line-height:0;"></span>

Hot Take from TFD19 – RPA with a Security First mindset

As someone who’s long been an advocate of automating the things, I got really excited when Automation Anywhere was announced as a presenter for Tech Field Day 19. For me it’s a great opportunity to learn about a rapidly growing market space, Robotic Process Automation (RPA). It’s also very timely for me professionally as the financial sector is a prime candidate for RPA and many conversations are being had around the efficiencies that can be derived from it.

That being said automation isn’t necessarily a unicorn. What if you write a bad process? What if you’re a bad person? What do you tell the auditors? If you don’t at least think about these questions, you may find yourself automating your way to the unemployment line.

2019-06-27 13_34_43-Tech Field Day 19 - Tech Field DayJust to set one more piece of context, I’ve been reading a lot lately about building a security program and the basics of a successful program. One idea that keeps popping up time and time again – everyone should have a security mindset, including your developers. However for many people, security is an afterthought. So it was refreshing when early on s presentation this lovely little slide popped up. The details are important, but more relevant is the fact that the folks at Automation recognized that their platform is powerful (insert necessary spiderman quote here) and therefore security has to be considered from the outset.

2019-06-27 13_44_37-Tech Field Day 19 - Tech Field DayNow from my view, these items should be table stakes for any software in 2019. The reality is that for the majority of the software industries features and functionality are prioritized over data security. I honestly am sitting here thinking through various software presentations I’ve seen over the years that treated security as a central premise, rather than an afterthought and I’m coming up empty. Given that RPA has the potential to be a giant attack vector for the bad guys, solace should be found in the fact that Automation Anywhere takes their responsibility to provide a secure solution seriously.

This security first mindset was then further demonstrated when 5 minutes were devoted to how you should properly promote code from dev to qa to prod. Taken alongside the fact that you can audit every action taken by every bot, under every user account context and the approach to security from the folks at Automation Anywhere is quite refreshing.

Many questions still exist for me, such as ‘how do you ensure resilience for your RPA solution?’ and ‘how easy are all of these controls to leverage? Can they be used at scale?’ Nevermind that you always need to do your due diligence for any platform that you introduce into your environment. All that being said, I’m looking forward to getting my hands on the free community edition of Automation Anywhere’s RPA product suite.

Disclaimer. As a guest of Tech Field Day as a delegate, my accommodations and travel have been paid for. The words and thoughts expressed herein are mine alone. I have not been compensated for this post.

Exchange Out of Office via PowerShell

I think we’ve all been in the situation where we take off on a lovely vacation and at some point in that first 24 hours you go “OH $^%# I forgot to set my out of office message!” We recently had that happen in a critical department at work and rather than deal with the ECP, I wanted to script this out as the situation is not abnormal…

So without further ado:

$user="username"
$enddate=get-date "April 22"
$inmessage="I am out of the office until $($enddate.toshortdatestring()). For immediate access, please contact my supervisor: $forwardaddress. Thank you and have a great day!"
$outmessage=$inmessage
$autoreply="Scheduled"

### if you would also like to setup a forward, change the value of $forward to true
$forward=$false
$forwardaddress="manager@domain.org"
$fork=$true

Set-MailboxAutoReplyConfiguration -Identity $user -InternalMessage $inmessage -ExternalMessage $outmessage -EndTime $enddate -AutoReplyState $autoreply

if($forward){
     Set-Mailbox $user -ForwardingAddress $fowardaddress -DeliverToMailboxAndForward $fork
}

lines 1-5 & 8-10: Set our variables because we don’t HARD-CODE. The first rule of Powershell club is that “YOU DON”T HARD-CODE VALUES!”  Actually this is ripe for converting to parameters in v2…
line 12: Here we come to the meat of the script, the Set-MailboxAutoReplyConfiguration cmdlet. As with most well formed cmdlets, once you find the relevant cmdlet, the parameters are pretty self explanatory… That being said, here’s a breakdown:

-Identity   This is the unique identifier for the mailbox. It accepts many value types that you can review here, but the major elements you’d pass in here are name, CN or email address.
-InternalMessage/-ExternalMessage   These are the messages that you’re sending out to your respective users. There are lots of examples about how to configure this parameter if you want to use HTML, but if you want to just add a simple text message, type away.
-EndTime   OK, I’m starting to feel dumb now, because this is pretty self-explanatory. This is when you want the Out Of Office message to expire. In my example script I use this as part of the message as well as a script parameter.
-AutoReplyState   You have three options here “Enabled” or send my OOO messages. “Disabled” or don’t send my OOO messages. “Scheduled” or send my OOO messages during the timeframe I already informed you about dummy!

line 14: On line 14 we check if the $forward variable is set to true. If not, have a good day! If it is true, we proceed to…

Line 15: We use a separate cmdlet here, Set-Mailbox. The Set-Mailbox cmdlet is used for many purposes related to general mailbox maintenance. There are dozens of parameters for this script, but in our case we use the parameters specifically to forward email messages on to the vacationing employees manager:

-ForwardingAddress   Where you are sending the emails to.
-DeliverToMailboxAndForward   If you want to forward emails AND deliver the messages to the original destination mailbox, set this to $true. If you’d like the mails to forward only, this value should be set to $false. IE. Messages are NOT delivered to the original mailbox if you set this to $false.

There is a lot you can do with Set-MailboxAutoReplyConfiguration, but when you run Get-MailboxAutoReplyConfiguration there ain’t a lot of options…


2018-04-18 11_16_25-mRemoteNG - confCons.xml - Exchange

In this final example we see that our message is set as we configured and the end date of our scheduled message has been set for our forgetful vacationer. As in previuos experiences (and blog posts) the Exchange PowerShell modules lay waste to what could have been a tedious problem.

Until next time…

This VM is getting long in the tooth…

Leverage Operations Manager to check the “summary|oversized metric and if the VM crosses thresholds… So long, farewell, auf Wiedersehen, good night

### Connect to vROps server
$cred=Get-Credential
Connect-OMServer -Server "Demo" -Credential $cred -AuthSource "ADdomain"

### set some things that will be used later when we do some things
$when = $(get-date).AddDays(-20)
$vkey = "Summary|Oversized"
$threshold = ".75"

foreach ($vm in $(get-vm|Select-Object -First 33)){
    ### get-stats on each VM from vROps
    $vrstat=$vm|Get-OMResource
    $avg = $vrstat|Get-OMStat -Key $vkey -from $when|Select-Object -ExpandProperty Value|Measure-Object -Average

    ### Remove VM's that surpass the threshold
    write-host $vm.name, $avg.average
    if($avg.Average -gt $threshold){
        write-host $vm.name, $avg.average
        if($vm.PowerState -eq "PoweredOn"){
            ### Confirm and WhatIf have been set to true in order to protect the innocent
            stop-vm -vm $vm -Confirm:$true -WhatIf:$true
        }
    Start-Sleep 3
    ### Confirm and WhatIf have been set to true in order to protect the innocent
    Remove-VM -vm $vm -DeletePermanently -RunAsync -Confirm:$true -WhatIf:$true
    }
}

Get-EsxCli oh my!

This post is the first detailed post coming out of my presentation Ditch the UI – vSphere Management with PowerCLI at the CT VMUG Usercon. Stay tuned for the full bakers dozen of code posts!

esxcli, oh my…

I was finishing a task the day before my presentation, at the CT VMUG usercon – Ditch the UI when I happened to come across the cmdlet Get-ESXCli. My first thought was “No. Really? This command exists and I’m just finding out about it now?” sigh…

But yes it’s true, the fine folks on the PowerCLI provided us this cmdlet some time ago, and I’m just learning about it now. Well, better late than never as they say.

Before we go any further, let’s take a minute to talk about esxcli. ESXCLI is a command line interface (duh) for ESXi systems. It’s a means to modify the VMHost systems, mostly but not entirely, as it relates to the hardware systems. It’s an early & essential, but limited, way of configuring some of the management elements for your ESXi hosts.

Now I mention it’s limitations because they are essential to our story. The first big limitation is the structure of tool. It’s structure is that of namespaces with a hierarchical tree. This means that when you want to access, oh I don’t know, VMFS information/properties/methods you had to know that VMFS exists as a sub-namespaces under the esxcli storage namespace. Not a big deal and some folks actually like the structure, although it’s never really work for me.

Of bigger concern with esxcli, is locality. What I mean is that it was difficult to manage multiple systems. Of course you had options like the vMA or vCLI, but again you’re limited with connectivity options. And it was ugly to programatically try to get around these limitations.

Needless to say I was stoked to come across get-esxcli the other day.

Get-ESXCli! Oh My!!!

I’m a tinkerer. When I see a new toy, I just want to fiddle with it. That being said, I also know from experience (good and bad) what you can do with esxcli, so my first stop on Wednesday was get-help.

2018-03-02 21_27_50-Windows PowerShell

Not terribly helpful… I guess we have no choice but to dive in. To start off, I saved the output of get-esxcli to a variable.

$esxcli=get-esxcli -VMHost $vmhost -V2

Now that we’ve got esxcli (see what I did there?) stored as an object, let’s see what we can do. First things first, echo it back to the screen to see what we get right out of the gate.

esxcli

Ok… well, this gives me something to go off of. It looks just like the structure of esxcli. I suppose that this shouldn’t be shocking, but it certainly is reassuring that we’re treading in semi-familiar territory. So it’s probably save to start moving down the tree.

esxcli_network_nic

Thank you Jeffrey Snover and team for allowing us to experience the wonders of things like tab complete and accessing sub-elements via the dot operator. So looking at a the output of $esxcli.network.nic we see that we can access things like TCP Segmentation Offload and VLAN’s. We get a few direct methods against our current level of the tree in addition to a Help() method.

esxcli_network_nic_help

OK, so this is starting to make a little more sense now. We’re basically taking the same namespaces and methods, but just making them look like PowerShell. At this point I figured I was good to go and just started firing off commands… which resulted in a lot of red text. After one of my frustrating attempts I actually paid attention to what tab-complete was showing me

esxcli_network_nic_down_authcomplete

Hey there “Invoke”? What are you doing there? How come I haven’t seen you in these parts before? After a few tests to get the syntax down, I learned that the .Invoke() method is how we actually get work done, and I can get down to the task I’d originally been so happy to automate.

Accessing the VAAI primitive

Ok, so I wasn’t quite ready to get to work yet.

$esxcli.storage.vmfs.unmap.Help()

After checking out help, just to make sure, I was ready to go…

Here’s my first script using the get-esxcli cmdlet. My whole intent was to programmatically go through my datastores, which resided on a thin-provisioned SAN, to free up any space that needed reclamation.

### Disclaimer. This one needs work, I was just so excited to learn about this cmdlet! To be continued....
Set-PowerCLIConfiguration -WebOperationTimeoutSeconds -1 -Scope Session -Confirm:$false

foreach ($cluster in $(get-cluster)){
  $dsarray=get-cluster $cluster|get-datastore
  $vmhost=get-cluster $cluster|Get-VMHost|select -First 1
  $esxcli=get-esxcli -VMHost $vmhost -V2
  foreach ($ds in $dsarray|where{$_.Type -eq 'VMFS'}){
      $esxcli.storage.vmfs.unmap.Invoke(@{reclaimunit = 60; volumelabel =$ds.name})
  }
}

I went at this script knowing that my storage volumes were mapped to all hosts in each of my clusters. If you weren’t in a similar vanilla situation you’d have to get a bit tricksier with your selection logic. However with knowledge of my environment at hand it was pretty simple to:

line 4: Iterate through each of my clusters.
line 5: Get each datastore for the specified cluster
line 6: Get the first VMHost in the cluster. This is ok because I know that all datastores are associated with all hosts in a given cluster.
line 7: Use our new friend get-esxcli against the previously retrieved VMHost.
lines 8-10: Iterate through each datastore in the cluster and run leverage the invoke method against the VMFS UNMAP primative
$esxcli.storage.vmfs.unmap.Invoke(@{reclaimunit = 60; volumelabel =$ds.name})

With that I was able to return a not insignificant amount of freed up space back to my array. After writing PowerShell code leveraging PowerCLI for the last few years, I’m feeling like I have a new array of opportunities open to me after newly discovering the Get-ESXCli cmdlet.

Happy scripting!

Scott


Performance Reports via vCenter statistics

Leverage get-stat to pull statistics from vCenter, build performance report based on averages

Connect-VIServer 
$myCol = @()
$start = (Get-Date).AddDays(-30)
$finish = Get-Date

$objServers = get-cluster cluster | Get-VM
foreach ($server in $objServers) {
    if ($server.guest.osfullname -ne $NULL){
        if ($server.guest.osfullname.contains("Windows")){
            $stats = get-stat -Entity $server -Stat "cpu.usage.average","mem.usage.average" -Start $start -Finish $finish

            $ServerInfo = ""|Select vName, OS, Mem, AvgMem, MaxMem, CPU, AvgCPU, MaxCPU, pDisk, Host
            $ServerInfo.vName  = $server.name
            $ServerInfo.OS     = $server.guest.osfullname
            $ServerInfo.Host   = $server.vmhost.name
            $ServerInfo.Mem    = $server.memoryGB
            $ServerInfo.AvgMem = $("{0:N2}" -f ($stats | where {$_.MetricId -eq "mem.usage.average"} |Measure-Object -Property Value -Average ).Average)
            $ServerInfo.MaxMem = $("{0:N2}" -f ($stats | where {$_.MetricId -eq "mem.usage.average"} |Measure-Object -Property Value -Maximum ).Maximum)
            $ServerInfo.CPU    = $server.numcpu
            $ServerInfo.AvgCPU = $("{0:N2}" -f ($stats | where {$_.MetricId -eq "cpu.usage.average"} |Measure-Object -Property Value -Average ).Average)
            $ServerInfo.MaxCPU = $("{0:N2}" -f ($stats | where {$_.MetricId -eq "cpu.usage.average"} |Measure-Object -Property Value -Maximum ).Maximum)
            $ServerInfo.pDisk  =[Math]::Round($server.ProvisionedSpaceGB,2)

            $mycol+=$ServerInfo
        }
    }
}

$myCol |Sort-Object vName| export-csv "VM_report.csv" -NoTypeInformation

Install programs via Invoke-VMScript

This script is a sample from a presentation I gave at the Connecticut VMUG UserCon. You can see all of the scripts from that presentation here. CTVMUG – Ditch the UI

I first wrote about the wonder of Invoke-VMScript just about a year ago. If you were to search this blog, you’d see that it turns up quite often. Honestly if the fine folks that work on PowerCLI had stopped after Invoke-VMScript, I’d probably have been OK with that.

Cutting to the chase Invoke-VMScript allows you to run scripts within a Virtual Machine’s OS. It’s a very powerful tool in that you can run PowerShell, batch or bash scripts within the context of the VM’s Windows or Linux OS.

Why would you want to automate this amazing tool? Why wouldn’t you want to?!? By leveraging this beautiful cmdlet, you can in many cases fully automate the deployment of a VM or installation of a VM within an app. Let’s be honest, as awesome as templates are they can only take you so far. Automation tools like vRA essentially operate off the same behavior, and not everyone has the funding to get those tools. For people like me Invoke-VMScript can be an extremely powerful tool that can be leveraged to great effect.

2018-03-03 22_27_45-Tom Angleberger quote_ Didn't Gandalf say _With great power comes great responsiHowever, with great power comes great responsibility. Because of the power presented with this tool, I’d recommend that you pay close attention to Role Based Access Control (among many other reasons). If you have a VM admin or operator with overly generous permissions, not only can they negatively impact your vSphere environment but they can also impact your VM’s as well, never mind compliance/auditing bag of worms that you can open.

OK, so we got the bad out of the way, here’s one of my favorite pieces of code I’ve ever written. It’s my favorite because it’s not pretty, but it sure gets the job done and moves the ball forward. That’s what we’re trying to do here, so here’s an example of how to leverage Invoke-VMScript to interact with VM OS.

write-host "Installing .NET Framework 4.5.2. If this step errors, you may be able to run the install script at c:\temp\.net4.5.2install.ps1"

    $installScript = @(
        'if (!$(test-path c:\temp\.NET4.5.2)) { New-Item -ItemType directory -path c:\temp\.NET4.5.2 }',
        '$NetFxURL = "http://download.microsoft.com/download/E/2/1/E21644B5-2DF2-47C2-91BD-63C560427900/NDP452-KB2901907-x86-x64-AllOS-ENU.exe"',
        '$NetFxPath = "c:\temp\.NET4.5.2\NDP452-KB2901907-x86-x64-AllOS-ENU.exe"',
        '$WebClient = New-Object System.Net.WebClient',
        '$WebClient.DownloadFile($NetFxURL,$NetFxPath)',
        '$process = (Start-Process -FilePath $NetFxPath -ArgumentList "/q /norestart" -Wait -Verb RunAs -PassThru)',
        'wuauclt /detectnow /reportnow',
        'wuauclt /updatenow'
    )

    foreach ($line in $installScript) {
        Invoke-VMScript `
			-ScriptText "echo ""$line"">>C:\temp\.net4.5.2install.ps1" `
			-ScriptType Bat `
			-vm $serverData.Hostname `
			-GuestCredential $creds.LocalAdmin
    }

    Invoke-VMScript `
		-ScriptText "echo ""$line"">>C:\temp\.net4.5.2install.ps1" `
		-ScriptType Bat `
		-vm $serverData.Hostname `
		-GuestCredential $creds.LocalAdmin
}

Please note this script could be condensed considerably by removing the backtick ` that allows us to continue a script command onto the next line, as exampled on lines 14-27

line 3-12: Store a series of commands into the array $installScript
line 14-20: Iterate through the $installScript array. For each line make use of the Install-VMScript command to echo the value out to a local file within the VM.
line 22-27: Use Invoke-VMScript to call the script that was created in the previous block.

It’s that simple. But I guess that’s the beauty of the solution. There are way more complicated ways of accomplishing the same ends. BUT if you have the tool, it’s easy and it’s free… Well I guess I’ll end this post similarly to how I started it: Why wouldn’t you make use of this amazing tool….

Checking SPBM compliance

Use New-VIProperty to save SPBM object within VirtualMachine objects.
Test to see if VM’s are compliant with their assign policy. If not, migrate to compliant storage.


### warning, highly inefficient code follows. simply an example for how to use VIproperty
New-VIProperty -Name SpbmCompliance -ObjectType VirtualMachine -Value {
$Args[0]| Get-SpbmEntityConfiguration -CheckComplianceNow
} -Force
### end of inefficient code. well, kind of...

$targetobject=get-cluster cluster|get-vm|Where-Object {$_.name -match "sql" -or $_.name -match "application" -or $_.name -match "linux"}

### Iterate through the targetobjects and check compliance status.
foreach ($vm in $targetobject){
if ($vm.SpbmCompliance.ComplianceStatus -ne "compliant"){
write-host "uh oh, $vm not compliant with $($($vm.SpbmCompliance).StoragePolicy)" -ForegroundColor Red -BackgroundColor White
### do something about nonCompliance
$tag=$($vm|Get-TagAssignment|Where-Object{$_.tag.Category -match "StorageTiers"}).Tag.Name
$destStorage=Get-SpbmCompatibleStorage -StoragePolicy $tag"Policy"|Select-Object -First 1
move-vm $vm -Datastore $destStorage
$(get-vm $vm).SpbmCompliance.ComplianceStatus
}
else{
write-host "Hooray $VM is super duper compliant!" -ForegroundColor Black -BackgroundColor Green
}
}

Tag based SPBM policy

Tags->rule->ruleset->policy

$targetobject=get-cluster NCFCU-SB-DC-cl|get-vm|Where-Object {$_.name -match "sql" -or $_.name -match "application" -or $_.name -match "linux"}


### Setup tags, rules, SPBM policy
New-TagCategory -Name "StorageTiers" -Cardinality Multiple -EntityType Datastore, VirtualMachine 

foreach ($category in @("Gold","Silver","Whatever")){
  New-Tag -Name $category"Tier" -Category "StorageTiers" 
  $rule = New-SpbmRule -AnyOfTags $(get-tag -Name $category"Tier") 
  $ruleset =New-SpbmRuleSet -Name $category"RuleSet" -AllOfRules $rule  
  New-SpbmStoragePolicy -Name $category"TierPolicy" -AnyOfRuleSets $ruleset 
  
  ###one line version
  ###New-SpbmStoragePolicy -Name $category"Policy" -RuleSet (New-SpbmRuleSet -Name $category"RuleSet" -AllOfRules @(New-SpbmRule -AnyOfTags $(new-tag -Name $category"Tier" -Category "StorageTiers")))
}


### assign tags to disks
New-TagAssignment -Tag "GoldTier" -Entity $(get-datastore ServerSL1)
New-TagAssignment -Tag "SilverTier" -Entity $(get-datastore ServerSL2)
New-TagAssignment -Tag "WhateverTier" -Entity $(get-datastore ServerSL3)


### iterate through targetobject, setting tags & policy
foreach ($vm in $targetobject){
  switch -Wildcard ($vm.name){
    '*sql*'{
        $tag="GoldTier"
    }
    '*application*'{
        $tag="SilverTier"
    }
    '*linux*'{
        $tag="WhateverTier"
    }
  }

  ### If there's a tag, assign the appropriate policy that matches tags.
  if($tag){
    New-TagAssignment -Entity $vm -Tag $tag  
    Set-SpbmEntityConfiguration -Configuration $(Get-SpbmEntityConfiguration $vm) -StoragePolicy $tag"Policy"
  }
  Clear-Variable tag
}