Getting started with Veeam for PowerShell

Shame on me! Right after VeeamOn 2018, life threw my family some major league curve-balls and I never had a chance to get my code shared out. Time to fix that…

For those of you who may be coming at this fresh, Veeam has provided a PowerShell SnapIn for configuring, maintaining and monitoring Backup and Replication. Simply choose to install the Veeam Backup and Recovery console from the B&R ..iso file or follow the instructions in this KB article. When you launch the Backup and Replication console, you’ll find a PowerShell menu option under the main Console menu. The way I write, I really need an ISE and as built you just get a PoSH window, rather than ISE. So I did a little sleuthing… and I mean little. I typed the command Get-History and low and behold, the VBR shortcut fires off a PowerShell script located at:

“C:\Program Files\Veeam\Backup and Replication\Console\Install-VeeamToolkit.ps1”

It’s always an interesting read to see how other people solve problems. Basically the script does a bunch of validation and calls another script C:\Program Files\Veeam\Backup and Replication\Console\Initialize-VeeamToolkit.ps1  more validation, aliases, options etc and finally we see two things:

  • The script functionality is delivered by VeeamPSSnapIn
  • The functions Get-VBRCommand and Get-VBRToolkitDocumentation are defined in the Initialize-VeeamToolkit.ps1 script. You’ll need another path if you want to make use of them, but I’m gonna help you out there in a minute.

TLDR: Add-PSSnapin VeeamPSSnapIn

Above I mentioned Get-VBRToolkitDocumentation.  Interestinglyl this function fires up the Veeam documentation at https://helpcenter.veeam.com/docs/backup/powershell/

It’s a pretty good and comprehensive document set, so I’d highly recommend checking it out. Seriously, it’s a really good guide with some great examples that I’d encourage you to explore.
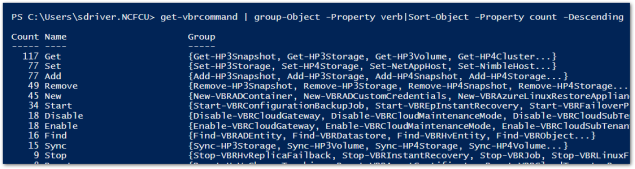
Get-VBRCommand

This is an interesting one. It basically uses the Get-Command to list out all of the VBR commands. If you drill into an individual command you get some more info about what’s under the cover, but what’s really interesting to me is if you take a peek at some of the numbers coming out of this function. As of this writing, there are

  • 510 individual cmdlets in the Veeam Backup and Replication SnapIn,
  • 27 Verbs
  • 259 Nouns

If you’re like me, that’s a pretty intimidating sample to tackle. But if you look at the data slightly differently, it gets much more manageable.

Starting with the Verbs, we see that 1/5 of the cmdlets are get’s and when you combine that with Set and Add over half of all the cmdlets from this snappin are accounted for.

veeam backup and replication powershell toolkit

Now when you turn to look at Nouns, the data is very different.

veeam backup and replication powershell toolkit2

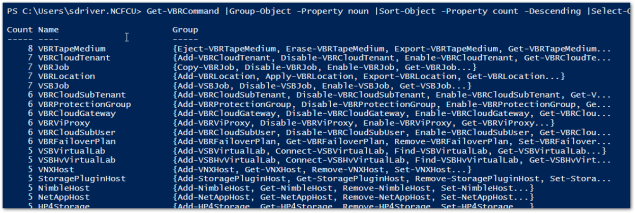
Wow… Verbs are consolidated, however nouns are numerous. This is odd at first glance, but when you think about it, it totally makes sense. The Veeam B&R snappins are meant to support a variety storage/backup/infrastructure products, but the actions you can perform across these products are more or less consistent. This consistency is great for you as you get started on your way towards automating your infrastucture with PowerShell. We’ll start going deeper into that infrastructure management in our next post, stay tuned!

If(Code -ne ISE){DontFret}

I’m behind the times, as usual…

I’ve been reluctant to give up my PowerShell ISE with ISEsteroids for years now, but I think it’s finally time to get onboard with VS code. It’s definitely a bit of a shift, so I thought that I’d add my thoughts to the chorus of users who’ve made the switch from ISE to Visual Studio Code.

I have an odd sense of humor, so I thought it would be fun to use ISE to download and install it’s replacement. Yes, I know it would’ve been faster to simply get it via browser, but did I mention my odd sense of humor…


$Uri="<a href="https://go.microsoft.com/fwlink/?Linkid=852157">https://go.microsoft.com/fwlink/?Linkid=852157</a>"

$download="$Home\Downloads\vscode_installer.exe"

Invoke-WebRequest -Uri $uri -OutFile $download

Start-Process -FilePath $download -ArgumentList "SP","/silent","/Log"

So after allowing UAC to run the file, we have a base install of VS code, that we can launch by simply typing the command ‘code‘ inside any Windows command interpreter.

2018-06-04 14_53_22-Untitled-1 — Visual Studio Code
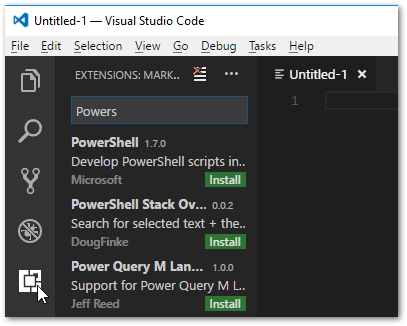
Since I write pretty much exclusively for PowerShell, there’s a couple of things that I need to do right out of the gate to make this tool useful. First off, code is meant to be portable and to fit many needs, so there isn’t a ton installed out of the gate. Code handles this conundrum via Extensions. To add an extension, simply click Extensions in the Activity bar. This will open up the Extension marketplace. In the marketplace simply search for the desired extension, in this case PowerShell and hit install. Code will make you reload your session in order to make use of the newly added PowerShell features.

I’m almost exclusively going to be writing PowerShell, so I’d like this to be configured  as best I can for that purpose. Step 1, make PowerShell the default terminal. We can do this a couple of ways, although it looks like the folks on the Code team may have changed the default behavior since the last time I looked. But I digress…

We can get to our user settings from the File Menu -> Preferences -> Settings, however I want to use one of the powerful features of Code, the command palette. The command palette is a very dynamic and powerful tool in Code, but much has already been written on it, so no need to retread the same ground. After entering the palette by typing ctrl-shift-p , I simply start typing what it is that I’m looking for, in this case default shell, and IntelliSense figures out the rest. After selecting the setting I’d like to change, VS code kindly offers me some suggestions. Sure enough after selecting the PowerShell option for “Terminal: Select Default Shell” I see a new setting in my user settings json file.


Finally when I go to check out my terminal, viola PowerShell is my default:2018-06-04 15_50_19-settings.json — Visual Studio Code

Next up, I want to make sure that my default language for VS code is PowerShell. This time I manually edit my settings (File Menu -> Preferences -> Settings) and add the line for “files.defaultLanguage”: “powershell”

 The reason for this is that by default VS Code files are in a plain text format (*.txt, *.gitignore). I’m sure that’s great for a lot of folks, but for me I use PowerShell in a day to day operational role. I’m not always writing code for reuse, often I’m writing and executing ad hoc scripts to be run via my friend F8. By changing the default language, when I start up a new, untitled and yet to be saved script Code knows that I’d like it to be interpretted as PowerShell and they even put the pretty icon for PoSh in the tab for my script.
2018_06_05_16_25_28_Untitled_1_Visual_Studio_Code
Oh, you can also see that IntelliSense recognizes the language and provides context specific assistance as well. BTW for this configuration, I found that I needed to restart Code completely, not just reload the window for the defaultlanguage setting to take effect.

The last thing I need to customize to make this feel like home is to set the switch for “powershell.integratedConsole.focusConsoleOnExecute”: false. Code’s default behavior is to move context from the script selection to the console on execution. If you’ve been using ISE, you’re used to the context staying at the script selection. Setting this switch to false will replicate the ISE behavior of not changing focus.

At this point I have Code configured to feel familiar enough that I can start using it for some functions. If you just want to jump to the punchline, here’s my very simple settings.json file.

{
"terminal.integrated.shell.windows": "C:\\Windows\\System32\\WindowsPowerShell\\v1.0\\powershell.exe",
"files.defaultLanguage": "powershell",
"powershell.integratedConsole.focusConsoleOnExecute": false
}

14727674df540bb3e5302bcb011cfb45_0As a long time ISESteroids user thought I’m having a really hard time making the shift from having a persistent Variables window to using the Code debugger. I’m not sure if I’m being a crotchety old man pounding away at the keyboard or if this will really be a road block for me making the shift permanently to Code. I guess time will tell…. In the meantime, if you’re new to using this tool, I’d urge you to pay attention to the tutorial Microsoft provides on install of VS code. It’s quite a solid walk through and will help with some of nuances of getting started.

If you have any additional tips and tricks on making the shift from ISE to Code, please reach out.

Until next time, happy writing.

Exchange Out of Office via PowerShell

I think we’ve all been in the situation where we take off on a lovely vacation and at some point in that first 24 hours you go “OH $^%# I forgot to set my out of office message!” We recently had that happen in a critical department at work and rather than deal with the ECP, I wanted to script this out as the situation is not abnormal…

So without further ado:

$user="username"
$enddate=get-date "April 22"
$inmessage="I am out of the office until $($enddate.toshortdatestring()). For immediate access, please contact my supervisor: $forwardaddress. Thank you and have a great day!"
$outmessage=$inmessage
$autoreply="Scheduled"

### if you would also like to setup a forward, change the value of $forward to true
$forward=$false
$forwardaddress="manager@domain.org"
$fork=$true

Set-MailboxAutoReplyConfiguration -Identity $user -InternalMessage $inmessage -ExternalMessage $outmessage -EndTime $enddate -AutoReplyState $autoreply

if($forward){
     Set-Mailbox $user -ForwardingAddress $fowardaddress -DeliverToMailboxAndForward $fork
}

lines 1-5 & 8-10: Set our variables because we don’t HARD-CODE. The first rule of Powershell club is that “YOU DON”T HARD-CODE VALUES!”  Actually this is ripe for converting to parameters in v2…
line 12: Here we come to the meat of the script, the Set-MailboxAutoReplyConfiguration cmdlet. As with most well formed cmdlets, once you find the relevant cmdlet, the parameters are pretty self explanatory… That being said, here’s a breakdown:

-Identity   This is the unique identifier for the mailbox. It accepts many value types that you can review here, but the major elements you’d pass in here are name, CN or email address.
-InternalMessage/-ExternalMessage   These are the messages that you’re sending out to your respective users. There are lots of examples about how to configure this parameter if you want to use HTML, but if you want to just add a simple text message, type away.
-EndTime   OK, I’m starting to feel dumb now, because this is pretty self-explanatory. This is when you want the Out Of Office message to expire. In my example script I use this as part of the message as well as a script parameter.
-AutoReplyState   You have three options here “Enabled” or send my OOO messages. “Disabled” or don’t send my OOO messages. “Scheduled” or send my OOO messages during the timeframe I already informed you about dummy!

line 14: On line 14 we check if the $forward variable is set to true. If not, have a good day! If it is true, we proceed to…

Line 15: We use a separate cmdlet here, Set-Mailbox. The Set-Mailbox cmdlet is used for many purposes related to general mailbox maintenance. There are dozens of parameters for this script, but in our case we use the parameters specifically to forward email messages on to the vacationing employees manager:

-ForwardingAddress   Where you are sending the emails to.
-DeliverToMailboxAndForward   If you want to forward emails AND deliver the messages to the original destination mailbox, set this to $true. If you’d like the mails to forward only, this value should be set to $false. IE. Messages are NOT delivered to the original mailbox if you set this to $false.

There is a lot you can do with Set-MailboxAutoReplyConfiguration, but when you run Get-MailboxAutoReplyConfiguration there ain’t a lot of options…


2018-04-18 11_16_25-mRemoteNG - confCons.xml - Exchange

In this final example we see that our message is set as we configured and the end date of our scheduled message has been set for our forgetful vacationer. As in previuos experiences (and blog posts) the Exchange PowerShell modules lay waste to what could have been a tedious problem.

Until next time…

This VM is getting long in the tooth…

Leverage Operations Manager to check the “summary|oversized metric and if the VM crosses thresholds… So long, farewell, auf Wiedersehen, good night

### Connect to vROps server
$cred=Get-Credential
Connect-OMServer -Server "Demo" -Credential $cred -AuthSource "ADdomain"

### set some things that will be used later when we do some things
$when = $(get-date).AddDays(-20)
$vkey = "Summary|Oversized"
$threshold = ".75"

foreach ($vm in $(get-vm|Select-Object -First 33)){
    ### get-stats on each VM from vROps
    $vrstat=$vm|Get-OMResource
    $avg = $vrstat|Get-OMStat -Key $vkey -from $when|Select-Object -ExpandProperty Value|Measure-Object -Average

    ### Remove VM's that surpass the threshold
    write-host $vm.name, $avg.average
    if($avg.Average -gt $threshold){
        write-host $vm.name, $avg.average
        if($vm.PowerState -eq "PoweredOn"){
            ### Confirm and WhatIf have been set to true in order to protect the innocent
            stop-vm -vm $vm -Confirm:$true -WhatIf:$true
        }
    Start-Sleep 3
    ### Confirm and WhatIf have been set to true in order to protect the innocent
    Remove-VM -vm $vm -DeletePermanently -RunAsync -Confirm:$true -WhatIf:$true
    }
}

Get-EsxCli oh my!

This post is the first detailed post coming out of my presentation Ditch the UI – vSphere Management with PowerCLI at the CT VMUG Usercon. Stay tuned for the full bakers dozen of code posts!

esxcli, oh my…

I was finishing a task the day before my presentation, at the CT VMUG usercon – Ditch the UI when I happened to come across the cmdlet Get-ESXCli. My first thought was “No. Really? This command exists and I’m just finding out about it now?” sigh…

But yes it’s true, the fine folks on the PowerCLI provided us this cmdlet some time ago, and I’m just learning about it now. Well, better late than never as they say.

Before we go any further, let’s take a minute to talk about esxcli. ESXCLI is a command line interface (duh) for ESXi systems. It’s a means to modify the VMHost systems, mostly but not entirely, as it relates to the hardware systems. It’s an early & essential, but limited, way of configuring some of the management elements for your ESXi hosts.

Now I mention it’s limitations because they are essential to our story. The first big limitation is the structure of tool. It’s structure is that of namespaces with a hierarchical tree. This means that when you want to access, oh I don’t know, VMFS information/properties/methods you had to know that VMFS exists as a sub-namespaces under the esxcli storage namespace. Not a big deal and some folks actually like the structure, although it’s never really work for me.

Of bigger concern with esxcli, is locality. What I mean is that it was difficult to manage multiple systems. Of course you had options like the vMA or vCLI, but again you’re limited with connectivity options. And it was ugly to programatically try to get around these limitations.

Needless to say I was stoked to come across get-esxcli the other day.

Get-ESXCli! Oh My!!!

I’m a tinkerer. When I see a new toy, I just want to fiddle with it. That being said, I also know from experience (good and bad) what you can do with esxcli, so my first stop on Wednesday was get-help.

2018-03-02 21_27_50-Windows PowerShell

Not terribly helpful… I guess we have no choice but to dive in. To start off, I saved the output of get-esxcli to a variable.

$esxcli=get-esxcli -VMHost $vmhost -V2

Now that we’ve got esxcli (see what I did there?) stored as an object, let’s see what we can do. First things first, echo it back to the screen to see what we get right out of the gate.

esxcli

Ok… well, this gives me something to go off of. It looks just like the structure of esxcli. I suppose that this shouldn’t be shocking, but it certainly is reassuring that we’re treading in semi-familiar territory. So it’s probably save to start moving down the tree.

esxcli_network_nic

Thank you Jeffrey Snover and team for allowing us to experience the wonders of things like tab complete and accessing sub-elements via the dot operator. So looking at a the output of $esxcli.network.nic we see that we can access things like TCP Segmentation Offload and VLAN’s. We get a few direct methods against our current level of the tree in addition to a Help() method.

esxcli_network_nic_help

OK, so this is starting to make a little more sense now. We’re basically taking the same namespaces and methods, but just making them look like PowerShell. At this point I figured I was good to go and just started firing off commands… which resulted in a lot of red text. After one of my frustrating attempts I actually paid attention to what tab-complete was showing me

esxcli_network_nic_down_authcomplete

Hey there “Invoke”? What are you doing there? How come I haven’t seen you in these parts before? After a few tests to get the syntax down, I learned that the .Invoke() method is how we actually get work done, and I can get down to the task I’d originally been so happy to automate.

Accessing the VAAI primitive

Ok, so I wasn’t quite ready to get to work yet.

$esxcli.storage.vmfs.unmap.Help()

After checking out help, just to make sure, I was ready to go…

Here’s my first script using the get-esxcli cmdlet. My whole intent was to programmatically go through my datastores, which resided on a thin-provisioned SAN, to free up any space that needed reclamation.

### Disclaimer. This one needs work, I was just so excited to learn about this cmdlet! To be continued....
Set-PowerCLIConfiguration -WebOperationTimeoutSeconds -1 -Scope Session -Confirm:$false

foreach ($cluster in $(get-cluster)){
  $dsarray=get-cluster $cluster|get-datastore
  $vmhost=get-cluster $cluster|Get-VMHost|select -First 1
  $esxcli=get-esxcli -VMHost $vmhost -V2
  foreach ($ds in $dsarray|where{$_.Type -eq 'VMFS'}){
      $esxcli.storage.vmfs.unmap.Invoke(@{reclaimunit = 60; volumelabel =$ds.name})
  }
}

I went at this script knowing that my storage volumes were mapped to all hosts in each of my clusters. If you weren’t in a similar vanilla situation you’d have to get a bit tricksier with your selection logic. However with knowledge of my environment at hand it was pretty simple to:

line 4: Iterate through each of my clusters.
line 5: Get each datastore for the specified cluster
line 6: Get the first VMHost in the cluster. This is ok because I know that all datastores are associated with all hosts in a given cluster.
line 7: Use our new friend get-esxcli against the previously retrieved VMHost.
lines 8-10: Iterate through each datastore in the cluster and run leverage the invoke method against the VMFS UNMAP primative
$esxcli.storage.vmfs.unmap.Invoke(@{reclaimunit = 60; volumelabel =$ds.name})

With that I was able to return a not insignificant amount of freed up space back to my array. After writing PowerShell code leveraging PowerCLI for the last few years, I’m feeling like I have a new array of opportunities open to me after newly discovering the Get-ESXCli cmdlet.

Happy scripting!

Scott


Performance Reports via vCenter statistics

Leverage get-stat to pull statistics from vCenter, build performance report based on averages

Connect-VIServer 
$myCol = @()
$start = (Get-Date).AddDays(-30)
$finish = Get-Date

$objServers = get-cluster cluster | Get-VM
foreach ($server in $objServers) {
    if ($server.guest.osfullname -ne $NULL){
        if ($server.guest.osfullname.contains("Windows")){
            $stats = get-stat -Entity $server -Stat "cpu.usage.average","mem.usage.average" -Start $start -Finish $finish

            $ServerInfo = ""|Select vName, OS, Mem, AvgMem, MaxMem, CPU, AvgCPU, MaxCPU, pDisk, Host
            $ServerInfo.vName  = $server.name
            $ServerInfo.OS     = $server.guest.osfullname
            $ServerInfo.Host   = $server.vmhost.name
            $ServerInfo.Mem    = $server.memoryGB
            $ServerInfo.AvgMem = $("{0:N2}" -f ($stats | where {$_.MetricId -eq "mem.usage.average"} |Measure-Object -Property Value -Average ).Average)
            $ServerInfo.MaxMem = $("{0:N2}" -f ($stats | where {$_.MetricId -eq "mem.usage.average"} |Measure-Object -Property Value -Maximum ).Maximum)
            $ServerInfo.CPU    = $server.numcpu
            $ServerInfo.AvgCPU = $("{0:N2}" -f ($stats | where {$_.MetricId -eq "cpu.usage.average"} |Measure-Object -Property Value -Average ).Average)
            $ServerInfo.MaxCPU = $("{0:N2}" -f ($stats | where {$_.MetricId -eq "cpu.usage.average"} |Measure-Object -Property Value -Maximum ).Maximum)
            $ServerInfo.pDisk  =[Math]::Round($server.ProvisionedSpaceGB,2)

            $mycol+=$ServerInfo
        }
    }
}

$myCol |Sort-Object vName| export-csv "VM_report.csv" -NoTypeInformation

Install programs via Invoke-VMScript

This script is a sample from a presentation I gave at the Connecticut VMUG UserCon. You can see all of the scripts from that presentation here. CTVMUG – Ditch the UI

I first wrote about the wonder of Invoke-VMScript just about a year ago. If you were to search this blog, you’d see that it turns up quite often. Honestly if the fine folks that work on PowerCLI had stopped after Invoke-VMScript, I’d probably have been OK with that.

Cutting to the chase Invoke-VMScript allows you to run scripts within a Virtual Machine’s OS. It’s a very powerful tool in that you can run PowerShell, batch or bash scripts within the context of the VM’s Windows or Linux OS.

Why would you want to automate this amazing tool? Why wouldn’t you want to?!? By leveraging this beautiful cmdlet, you can in many cases fully automate the deployment of a VM or installation of a VM within an app. Let’s be honest, as awesome as templates are they can only take you so far. Automation tools like vRA essentially operate off the same behavior, and not everyone has the funding to get those tools. For people like me Invoke-VMScript can be an extremely powerful tool that can be leveraged to great effect.

2018-03-03 22_27_45-Tom Angleberger quote_ Didn't Gandalf say _With great power comes great responsiHowever, with great power comes great responsibility. Because of the power presented with this tool, I’d recommend that you pay close attention to Role Based Access Control (among many other reasons). If you have a VM admin or operator with overly generous permissions, not only can they negatively impact your vSphere environment but they can also impact your VM’s as well, never mind compliance/auditing bag of worms that you can open.

OK, so we got the bad out of the way, here’s one of my favorite pieces of code I’ve ever written. It’s my favorite because it’s not pretty, but it sure gets the job done and moves the ball forward. That’s what we’re trying to do here, so here’s an example of how to leverage Invoke-VMScript to interact with VM OS.

write-host "Installing .NET Framework 4.5.2. If this step errors, you may be able to run the install script at c:\temp\.net4.5.2install.ps1"

    $installScript = @(
        'if (!$(test-path c:\temp\.NET4.5.2)) { New-Item -ItemType directory -path c:\temp\.NET4.5.2 }',
        '$NetFxURL = "http://download.microsoft.com/download/E/2/1/E21644B5-2DF2-47C2-91BD-63C560427900/NDP452-KB2901907-x86-x64-AllOS-ENU.exe"',
        '$NetFxPath = "c:\temp\.NET4.5.2\NDP452-KB2901907-x86-x64-AllOS-ENU.exe"',
        '$WebClient = New-Object System.Net.WebClient',
        '$WebClient.DownloadFile($NetFxURL,$NetFxPath)',
        '$process = (Start-Process -FilePath $NetFxPath -ArgumentList "/q /norestart" -Wait -Verb RunAs -PassThru)',
        'wuauclt /detectnow /reportnow',
        'wuauclt /updatenow'
    )

    foreach ($line in $installScript) {
        Invoke-VMScript `
			-ScriptText "echo ""$line"">>C:\temp\.net4.5.2install.ps1" `
			-ScriptType Bat `
			-vm $serverData.Hostname `
			-GuestCredential $creds.LocalAdmin
    }

    Invoke-VMScript `
		-ScriptText "echo ""$line"">>C:\temp\.net4.5.2install.ps1" `
		-ScriptType Bat `
		-vm $serverData.Hostname `
		-GuestCredential $creds.LocalAdmin
}

Please note this script could be condensed considerably by removing the backtick ` that allows us to continue a script command onto the next line, as exampled on lines 14-27

line 3-12: Store a series of commands into the array $installScript
line 14-20: Iterate through the $installScript array. For each line make use of the Install-VMScript command to echo the value out to a local file within the VM.
line 22-27: Use Invoke-VMScript to call the script that was created in the previous block.

It’s that simple. But I guess that’s the beauty of the solution. There are way more complicated ways of accomplishing the same ends. BUT if you have the tool, it’s easy and it’s free… Well I guess I’ll end this post similarly to how I started it: Why wouldn’t you make use of this amazing tool….

Checking SPBM compliance

Use New-VIProperty to save SPBM object within VirtualMachine objects.
Test to see if VM’s are compliant with their assign policy. If not, migrate to compliant storage.


### warning, highly inefficient code follows. simply an example for how to use VIproperty
New-VIProperty -Name SpbmCompliance -ObjectType VirtualMachine -Value {
$Args[0]| Get-SpbmEntityConfiguration -CheckComplianceNow
} -Force
### end of inefficient code. well, kind of...

$targetobject=get-cluster cluster|get-vm|Where-Object {$_.name -match "sql" -or $_.name -match "application" -or $_.name -match "linux"}

### Iterate through the targetobjects and check compliance status.
foreach ($vm in $targetobject){
if ($vm.SpbmCompliance.ComplianceStatus -ne "compliant"){
write-host "uh oh, $vm not compliant with $($($vm.SpbmCompliance).StoragePolicy)" -ForegroundColor Red -BackgroundColor White
### do something about nonCompliance
$tag=$($vm|Get-TagAssignment|Where-Object{$_.tag.Category -match "StorageTiers"}).Tag.Name
$destStorage=Get-SpbmCompatibleStorage -StoragePolicy $tag"Policy"|Select-Object -First 1
move-vm $vm -Datastore $destStorage
$(get-vm $vm).SpbmCompliance.ComplianceStatus
}
else{
write-host "Hooray $VM is super duper compliant!" -ForegroundColor Black -BackgroundColor Green
}
}

Tag based SPBM policy

Tags->rule->ruleset->policy

$targetobject=get-cluster NCFCU-SB-DC-cl|get-vm|Where-Object {$_.name -match "sql" -or $_.name -match "application" -or $_.name -match "linux"}


### Setup tags, rules, SPBM policy
New-TagCategory -Name "StorageTiers" -Cardinality Multiple -EntityType Datastore, VirtualMachine 

foreach ($category in @("Gold","Silver","Whatever")){
  New-Tag -Name $category"Tier" -Category "StorageTiers" 
  $rule = New-SpbmRule -AnyOfTags $(get-tag -Name $category"Tier") 
  $ruleset =New-SpbmRuleSet -Name $category"RuleSet" -AllOfRules $rule  
  New-SpbmStoragePolicy -Name $category"TierPolicy" -AnyOfRuleSets $ruleset 
  
  ###one line version
  ###New-SpbmStoragePolicy -Name $category"Policy" -RuleSet (New-SpbmRuleSet -Name $category"RuleSet" -AllOfRules @(New-SpbmRule -AnyOfTags $(new-tag -Name $category"Tier" -Category "StorageTiers")))
}


### assign tags to disks
New-TagAssignment -Tag "GoldTier" -Entity $(get-datastore ServerSL1)
New-TagAssignment -Tag "SilverTier" -Entity $(get-datastore ServerSL2)
New-TagAssignment -Tag "WhateverTier" -Entity $(get-datastore ServerSL3)


### iterate through targetobject, setting tags & policy
foreach ($vm in $targetobject){
  switch -Wildcard ($vm.name){
    '*sql*'{
        $tag="GoldTier"
    }
    '*application*'{
        $tag="SilverTier"
    }
    '*linux*'{
        $tag="WhateverTier"
    }
  }

  ### If there's a tag, assign the appropriate policy that matches tags.
  if($tag){
    New-TagAssignment -Entity $vm -Tag $tag  
    Set-SpbmEntityConfiguration -Configuration $(Get-SpbmEntityConfiguration $vm) -StoragePolicy $tag"Policy"
  }
  Clear-Variable tag
}

Cleanup snapshots

Nobody likes old or bloated VM snapshots, but we’ve all had to deal with them from time to time. If you were feeling super crotchety or perhaps confident, you could run this simple one-liner and just take out all of the snapshots in your cluster.

get-cluster cluster|get-vm|get-snapshot|remove-snapshot -whatif

First off, I left the -whatif parameter in this snip to protect the innocent. But I guess if you’re really feeling that cranky…

Chances are you don’t want to be that guy, so perhaps a kinder approach might be warranted?

Get all snapshots in the targetobject and if surpassing the specified thresholds email your lazy admin
$datethreshold=-30
$sizethreshold=10
$targetobject=get-cluster cluster|get-vm

$snaps=$targetobject|Get-Snapshot

foreach($snap in $snaps) {
  if ($snap.created -lt (get-date).adddays($datethreshold) -or $snap.SizeGB -gt $sizethreshold) {
    $source="$global:DefaultVIServer@your.org"
    $dest="LazyAdmin@your.org"
    $subject="Clean up your room!"
    $relay="relay.your.org"
    $body="
      You've got some housecleaning to do:
      VM:           $($snap.VM)
      Snap name:    $($snap.name)
      Created date: $($snap.created)
      Size (GB):    $([math]::Round($snap.SizeGB,2))
    "
    Send-MailMessage -to $dest -From $source -Subject $subject -Body $body -SmtpServer $relay 

    #if you don't care about other peoples snapshots, just uncomment the next line and boom!
    #$snap|remove-snapshot
  }
}